
How To Install and Secure phpMyAdmin with Apache on a CentOS 7 Server
Introduction
Relational database management systems like MySQL and MariaDB are needed for a significant portion of web sites and applications. However, not all users feel comfortable administering their data from the command line.
To solve this problem, a project called phpMyAdmin was created in order to offer an alternative in the form of a web-based management interface. In this guide, we will demonstrate how to install and secure a phpMyAdmin configuration on a CentOS 7 server. We will build this setup on top of the Apache web server, the most popular web server in the world.
Prerequisites
Before we begin, there are a few requirements that need to be settled.
To ensure that you have a solid base to build this system upon, you should run through our initial server setup guide for CentOS 7. Among other things, this will walk you through setting up a non-root user with sudo access for administrative commands.
The second prerequisite that must be fulfilled in order to start on this guide is to install a LAMP (Linux, Apache, MariaDB, and PHP) stack on your CentOS 7 server. This is the platform that we will use to serve our phpMyAdmin interface (MariaDB is also the database management software that we are wishing to manage). If you do not yet have a LAMP installation on your server, follow our tutorial on installing LAMP on CentOS 7.
When your server is in a properly functioning state after following these guides, you can continue on with the rest of this page.
Step One — Install phpMyAdmin
With our LAMP platform already in place, we can begin right away with installing the phpMyAdmin software. Unfortunately, phpMyAdmin is not available in CentOS 7's default repository.
To get the packages we need, we'll have to add an additional repo to our system. The EPEL repo (Extra Packages for Enterprise Linux) contains many additional packages, including the phpMyAdmin package we are looking for.
The EPEL repository can be made available to your server by installing a special package called epel-release. This will reconfigure your repository list and give you access to the EPEL packages.
To install, just type:
sudo yum install epel-release
Now that the EPEL repo is configured, you can install the phpMyAdmin package using the yum packaging system by typing:
sudo yum install phpmyadmin
The installation will now complete. The installation included an Apache configuration file that has already been put into place. We will need to modify this a bit to get it to work correctly for our installation.
Open the file in your text editor now so that we can make a few changes:
sudo nano /etc/httpd/conf.d/phpMyAdmin.conf
Inside, we see some directory blocks with some conditional logic to explain the access policy for our directory. There are two distinct directories that are defined, and within these, configurations that will be valid for both Apache 2.2 and Apache 2.4 (which we are running).
Currently, this setup is configured to deny access to any connection not being made from the server itself. Since we are working on our server remotely, we need to modify some lines to specify the IP address of your home connection.
Change any lines that read Require ip 127.0.0.1 or Allow from 127.0.0.1 to refer to your home connection's IP address. If you need help finding the IP address of your home connection, check out the next section. There should be four locations in the file that must be changed:
. . .
Require ip your_workstation_IP_address
. . .
Allow from your_workstation_IP_address
. . .
Require ip your_workstation_IP_address
. . .
Allow from your_workstation_IP_address
. . .
When you are finished, restart the Apache web server to implement your modifications by typing:
sudo systemctl restart httpd.service
With that, our phpMyAdmin installation is now operational. To access the interface, go to your server's domain name or public IP address followed by /phpMyAdmin, in your web browser:
http://server_domain_or_IP/phpMyAdmin

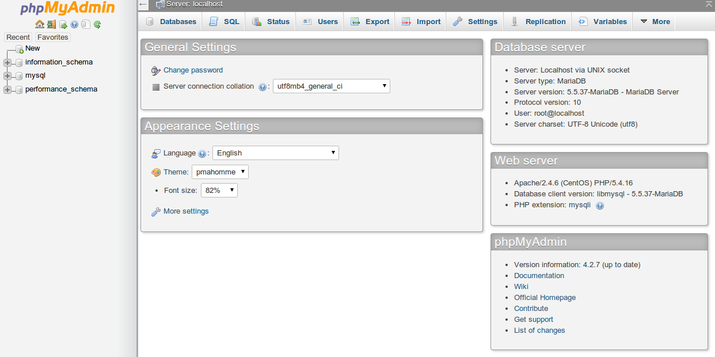
To sign in, use a username/password pair of a valid MariaDB user. The root user and the MariaDB administrative password is a good choice to get started. You will then be able to access the administrative interface:

Find Your IP Address
You will need to know the IP address of the computer you are using to access your databases in order to complete the step above. This is a security precaution so that unauthorized people cannot connect to your server.
Note: This is not the IP address of your VPS, it is the IP address of your home or work computer.
You can find out how the greater web sees your IP address by visiting one of these sites in your web browser:
Compare a few different sites and make sure they all give you the same value. Use this value in the configuration file above.
Step Two — Secure your phpMyAdmin Instance
The phpMyAdmin instance installed on our server should be completely usable at this point. However, by installing a web interface, we have exposed our MySQL system to the outside world.
Even with the included authentication screen, this is quite a problem. Because of phpMyAdmin's popularity combined with the large amount of data it provides access to, installations like these are common targets for attackers.
We will implement two simple strategies to lessen the chances of our installation being targeted and compromised. We will change the location of the interface from /phpMyAdmin to something else to sidestep some of the automated bot brute-force attempts. We will also create an additional, web server-level authentication gateway that must be passed before even getting to the phpMyAdmin login screen.
Changing the Application's Access Location
In order for our Apache web server to work with phpMyAdmin, our phpMyAdmin Apache configuration file uses an alias to point to the directory location of the files.
To change the URL where our phpMyAdmin interface can be accessed, we simply need to rename the alias. Open the phpMyAdmin Apache configuration file now:
sudo nano /etc/httpd/conf.d/phpMyAdmin.conf
Toward the top of the file, you will see two lines that look like this:
Alias /phpMyAdmin /usr/share/phpMyAdmin
Alias /phpmyadmin /usr/share/phpMyAdmin
These two lines are our aliases, which means that if we access our site's domain name or IP address, followed by either /phpMyAdmin or /phpmyadmin, we will be served the content at /usr/share/phpMyAdmin.
We want to disable these specific aliases since they are heavily targeted by bots and malicious users. Instead, we should decide on our own alias. It should be easy to remember, but not easy to guess. It shouldn't indicate the purpose of the URL location. In our case, we'll go with /nothingtosee.
To apply our intended changes, we should remove or comment out the existing lines and add our own:
# Alias /phpMyAdmin /usr/share/phpMyAdmin
# Alias /phpmyadmin /usr/share/phpMyAdmin
Alias /nothingtosee /usr/share/phpMyAdmin
When you are finished, save and close the file.
To implement the changes, restart the web service:
sudo systemctl restart httpd.service
Now, if you go to the previous location of your phpMyAdmin installation, you will get a 404 error:
http://server_domain_or_IP/phpMyAdmin

However, your phpMyAdmin interface will be available at the new location we selected:
http://server_domain_or_IP/nothingtosee

Setting up a Web Server Authentication Gate
The next feature we wanted for our installation was an authentication prompt that a user would be required to pass before ever seeing the phpMyAdmin login screen.
Fortunately, most web servers, including Apache, provide this capability natively. We will just need to modify our Apache configuration file to use an authorization file.
Open the phpMyAdmin Apache configuration file in your text editor again:
sudo nano /etc/httpd/conf.d/phpMyAdmin.conf
Within the /usr/share/phpMyAdmin directory block, but outside of any of the blocks inside, we need to add an override directive. It will look like this:
. . .
<Directory /usr/share/phpMyAdmin/>
   AllowOverride All
   <IfModule mod_authz_core.c>
   . . .
</Directory>
. . .
This will allow us to specify additional configuration details in a file called .htaccess located within the phpMyAdmin directory itself. We will use this file to set up our password authentication.
Save and close the file when you are finished.
Restart the web service to implement this change:
sudo systemctl restart httpd.service
Create an .htaccess File
Now that we have the override directive in our configuration, Apache will look for a file called .htaccess within the /usr/share/phpMyAdmin directory. If it finds one, it will use the directives contained within to supplement its previous configuration data.
Our next step is to create the .htaccess file within that directory. Use your text editor to do so now:
sudo nano /usr/share/phpMyAdmin/.htaccess
Within this file, we need to enter the following information:
AuthType Basic
AuthName "Admin Login"
AuthUserFile /etc/httpd/pma_pass
Require valid-user
Let's go over what each of these lines mean:
- AuthType Basic: This line specifies the authentication type that we are implementing. This type will implement password authentication using a password file.
- AuthName: This sets the message for the authentication dialog box. You should keep this generic so that unauthorized users won't gain knowledge about what is being protected.
- AuthUserFile: This sets the location of the actual password file that will be used for authentication. This should be outside of the directories that are being served. We will create this file in a moment.
- Require valid-user: This specifies that only authenticated users should be given access to this resource. This is what actually stops unauthorized users from entering.
When you are finished entering this information, save and close the file.
Create the Password File for Authentication
Now that we have specified the location for our password file through the use of the AuthUserFile directive in our .htaccess file, we need to create and populate the password file.
This can be accomplished through the use of an Apache utility called htpasswd. We invoke the command by passing it the location where we would like to create the file and the username we would like to enter authentication details for:
sudo htpasswd -c /etc/httpd/pma_pass username
The -c flag indicates that this will create an initial file. The directory location is the path and filename that will be used for the file. The username is the first user we would like to add. You will be prompted to enter and confirm a password for the user.
If you want to add additional users to authenticate, you can call the same command again without the -c flag, and with a new username:
sudo htpasswd /etc/httpd/pma_pass seconduser
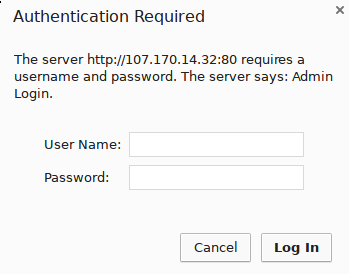
With our password file created, an authentication gateway has been implemented and we should now see a password prompt the next time we visit our site:
http://server_domain_or_IP/nothingtosee

Once you enter your credentials, you will be taken to the normal phpMyAdmin login page. This added layer of protection will help keep your MySQL logs clean of authentication attempts in addition to the added security benefit.
Conclusion
You can now manage your MySQL databases from a reasonably secure web interface. This UI exposes most of the functionality that is available from the MySQL command prompt. You can view databases and schema, execute queries, and create new data sets and structures.

50 Comments