
How To Set Up Jupyter Notebook for Python 3
Introduction
Jupyter Notebook offers a command shell for interactive computing as a web application. The tool can be used with several languages, including Python, Julia, R, Haskell, and Ruby. It is often used for working with data, statistical modeling, and machine learning.
This tutorial will walk you through setting up Jupyter Notebook to run either locally or from an Ubuntu 16.04 server, as well as teach you how to connect to and use the notebook. Jupyter notebooks (or simply notebooks) are documents produced by the Jupyter Notebook app which contain both computer code and rich text elements (paragraph, equations, figures, links, etc.) which aid in presenting and sharing reproducible research.
By the end of this guide, you will be able to run Python 3 code using Jupyter Notebook running on a local machine or remote server.
Prerequisites
To follow this tutorial, you will need a Python 3 programming environment, either
- on your local machine, or
- on an Ubuntu 16.04 server.
All the commands in this tutorial should be run as a non-root user. If root access is required for the command, it will be preceded by sudo. Initial Server Setup with Ubuntu 16.04 explains how to add users and give them sudo access.
Step 1 — Installing Jupyter Notebook
In this section we will install Jupyter Notebook with pip.
Activate the Python 3 programming environment you would like to install Jupyter Notebook into. In our example, we’ll install it into my_env, so we will ensure we’re in that environment’s directory and activate it like so:
- cd ~/environments
- . my_env/bin/activate
Next, we can ensure that pip is upgraded to the most recent version:
- pip install --upgrade pip
Now we can install Jupyter Notebook with the following command:
- pip install jupyter
At this point Jupyter Notebook is installed into the current programming environment.
The next optional step is for those connecting a server installation of the web interface using SSH tunnelling.
Step 2 (Optional) — Using SSH Tunneling to Connect to a Server Installation
If you installed Jupyter Notebook on a server, in this section we will learn how to connect to the Jupyter Notebook web interface using SSH tunneling. Since Jupyter Notebook will run on a specific port on the server (such as :8888, :8889 etc.), SSH tunneling enables you to connect to the server’s port securely.
The next two subsections describe how to create an SSH tunnel from 1) a Mac or Linux and 2) Windows. Please refer to the subsection for your local computer.
SSH Tunneling with a Mac or Linux
If you are using a Mac or Linux, the steps for creating an SSH tunnel are similar to the How To Use SSH Keys with DigitalOcean Droplets using Linux or Mac guide except there are additional parameters added in the ssh command. This subsection will outline the additional parameters needed in the ssh command to tunnel successfully.
SSH tunneling can be done by running the following SSH command in a new local terminal window:
- ssh -L 8888:localhost:8888 your_server_username@your_server_ip
The ssh command opens an SSH connection, but -L specifies that the given port on the local (client) host is to be forwarded to the given host and port on the remote side (server). This means that whatever is running on the second port number (e.g. 8888) on the server will appear on the first port number (e.g. 8888) on your local computer.
Optionally change port 8888 to one of your choosing to avoid using a port already in use by another process.
server_username is your username (e.g. sammy) on the server which you created and your_server_ip is the IP address of your server.
For example, for the username sammy and the server address 203.0.113.0, the command would be:
- ssh -L 8888:localhost:8888 sammy@203.0.113.0
If no error shows up after running the ssh -L command, you can move into your programming environment and run Jupyter Notebook:
- jupyter notebook
You’ll receive output with a URL. From a web browser on your local machine, open the Jupyter Notebook web interface with the URL that starts with http://localhost:8888. Ensure that the token number is included, or enter the token number string when prompted at http://localhost:8888.
SSH Tunneling with Windows and Putty
If you are using Windows, you can create an SSH tunnel using Putty as outlined in How To Use SSH Keys with PuTTY on DigitalOcean Droplets (Windows users).
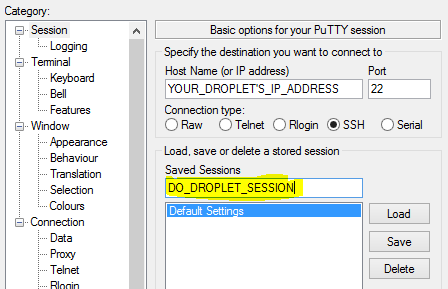
First, enter the server URL or IP address as the hostname as shown:

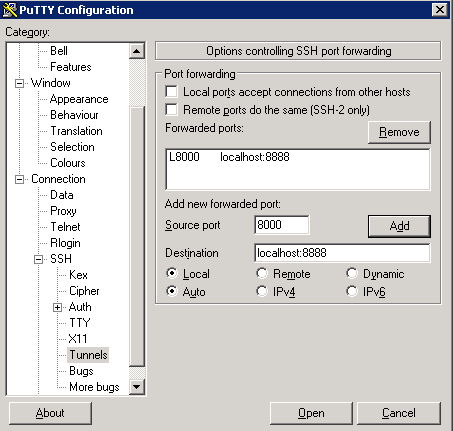
Next, click SSH on the bottom of the left pane to expand the menu, and then click Tunnels. Enter the local port number to use to access Jupyter on your local machine. Choose 8000 or greater to avoid ports used by other services, and set the destination as localhost:8888 where :8888 is the number of the port that Jupyter Notebook is running on.
Now click the Add button, and the ports should appear in the Forwarded ports list:

Finally, click the Open button to connect to the server via SSH and tunnel the desired ports. Navigate to http://localhost:8000 (or whatever port you chose) in a web browser to connect to Jupyter Notebook running on the server. Ensure that the token number is included, or enter the token number string when prompted at http://localhost:8000.
Step 3 — Running Jupyter Notebook
With Jupyter Notebook installed, you can run it in your terminal. To do so, execute the following command:
- jupyter notebook
A log of the activities of the Jupyter Notebook will be printed to the terminal. When you run Jupyter Notebook, it runs on a specific port number. The first notebook you are running will usually run on port 8888. To check the specific port number Jupyter Notebook is running on, refer to the output of the command used to start it:
Output[I NotebookApp] Serving notebooks from local directory: /home/sammy
[I NotebookApp] 0 active kernels
[I NotebookApp] The Jupyter Notebook is running at: http://localhost:8888/
[I NotebookApp] Use Control-C to stop this server and shut down all kernels (twice to skip confirmation).
...
If you are running Jupyter Notebook on a local computer (not on a server), your default browser should have opened the Jupyter Notebook web app. If not, or if you close the window, you can navigate to the URL provided in the output, or navigate to localhost:8888 to connect.
Whenever you would like to stop the Jupyter Notebook process, press CTRL+C, type Y when prompted, and then hit ENTER to confirm.
You’ll receive the following output:
Output[C 12:32:23.792 NotebookApp] Shutdown confirmed
[I 12:32:23.794 NotebookApp] Shutting down kernels
Jupyter Notebook is now no longer running.
Step 4 — Using Jupyter Notebook
This section goes over the basics of using Jupyter Notebook. If you don’t currently have Jupyter Notebook running, start it with the jupyter notebook command.
You should now be connected to it using a web browser. Jupyter Notebook is very powerful and has many features. This section will outline a few of the basic features to get you started using the notebook. Jupyter Notebook will show all of the files and folders in the directory it is run from, so when you’re working on a project make sure to start it from the project directory.
To create a new notebook file, select New > Python 3 from the top right pull-down menu:

This will open a notebook. We can now run Python code in the cell or change the cell to markdown. For example, change the first cell to accept Markdown by clicking Cell > Cell Type > Markdown from the top navigation bar. We can now write notes using Markdown and even include equations written in LaTeX by putting them between the $$ symbols. For example, type the following into the cell after changing it to markdown:
# Simple Equation

Let us now implement the following equation:
$$ y = x^2$$

where $x = 2$
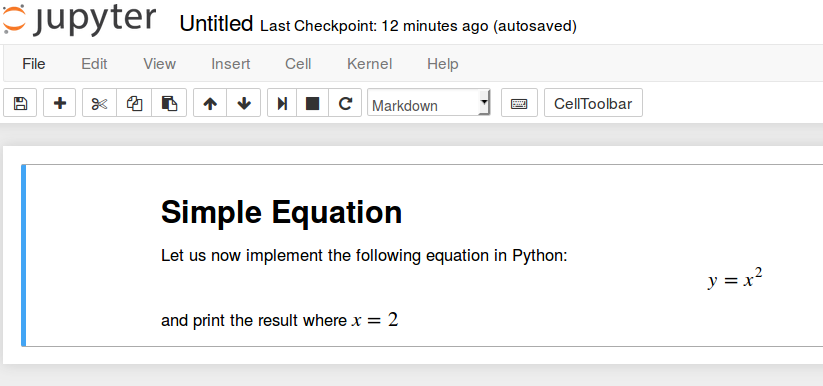
To turn the markdown into rich text, press CTRL+ENTER, and the following should be the results:

You can use the markdown cells to make notes and document your code. Let's implement that simple equation and print the result. Click on the top cell, then press ALT+ENTER to add a cell below it. Enter the following code in the new cell.
x = 2
y = x**2
print(y)
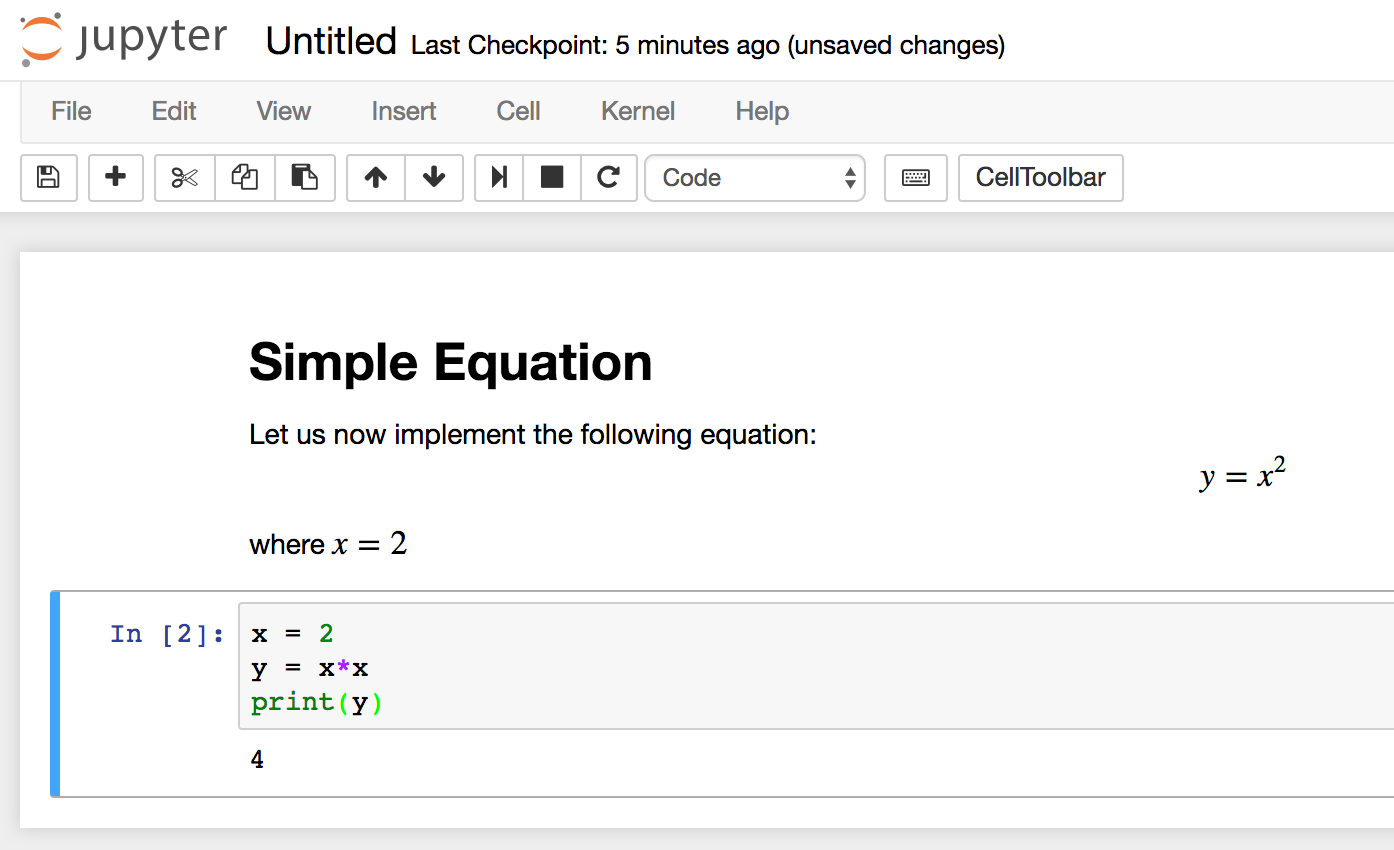
To run the code, press CTRL+ENTER. You’ll receive the following results:

You now have the ability to import modules and use the notebook as you would with any other Python development environment!
Conclusion
Congratulations! You should now be able to write reproducible Python code and notes in Markdown using Jupyter Notebook. To get a quick tour of Jupyter Notebook from within the interface, select Help > User Interface Tour from the top navigation menu to learn more.
From here, you may be interested to read our series on Time Series Visualization and Forecasting.

8 Comments