How To Use node.js, request and cheerio to Set Up Simple Web-Scraping
Introduction:
In this tutorial, we will scrape the front page of Hacker News to get all the top ranking links as well as their metadata - such as the title, URL and the number of points/comments it received. This is one of many techniques to extract data from web pages using node.js and mainly uses a module called cheerio by Matthew Mueller which implements a subset of jQuery specifically designed for server use.
Cheerio is lightweight, fast, flexible and easy to use, if you're already accustomed to working with jQuery. We will also make use of Mikael Rogers' excellent request module as a simplified HTTP client.
Requirements:
I will assume that you're already familiar with node.js, jQuery and basic Linux administrative tasks like connecting to your VPS using SSH.
If you're unfamiliar with node.js or if you haven't installed it yet, please refer to the Articles & Tutorials section above to find installation instructions for your operating system.
Code:
To install the required modules using NPM, simply type the following command:
npm install request cheerio
This will install the modules in your current working directory only.
To install the modules globally run:
npm install -g request cheerio
Create a file called scrape.js and add the following lines:
var request = require('request');
var cheerio = require('cheerio');
This will load all of our module dependencies.
Now we'll load the front page of Hacker News with a simple request and display the HTML code of the page, if no error occurs and the HTTP status code equals 200.
Append these lines to the file:
request('https://news.ycombinator.com', function (error, response, html) {
  if (!error && response.statusCode == 200) {
    console.log(html);
  }
});
Try running the script using node scrape.js and you
should see the HTML code being logged in your terminal
window.
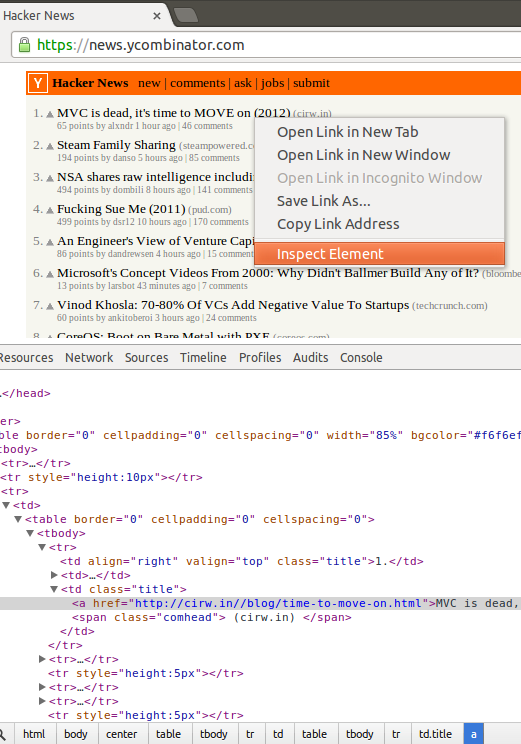
In order to know how to extract our desired meta-data, we need to know how the elements are structured within the HTML code. A preferred way is to use the web-developer tools built into Google Chrome to inspect the desired target element on the web page simply by right clicking on it and selecting "Inspect element".
In this example, I've opened Hacker News in Chrome, right-clicked and inspected the title of the top ranking story:

After a quick look at the web-developer console, I came to the conclusion that we could simply select each "span" element which has a class added to it named "comhead" and select the "a" element above it by using the jQuery API function prev() to easily parse all 30 top ranking links and their titles.
We can test my assumption by changing our request code to this:
request('https://news.ycombinator.com', function (error, response, html) {
  if (!error && response.statusCode == 200) {
    var $ = cheerio.load(html);
    $('span.comhead').each(function(i, element){
      var a = $(this).prev();
      console.log(a.text());
    });
  }
});
As expected, by running the code we get a list of 30 titles. Let's modify it a bit more to parse the remaining metadata:
request('https://news.ycombinator.com', function (error, response, html) {
  if (!error && response.statusCode == 200) {
    var $ = cheerio.load(html);
    $('span.comhead').each(function(i, element){
      var a = $(this).prev();
      var rank = a.parent().parent().text();
      var title = a.text();
      var url = a.attr('href');
      var subtext = a.parent().parent().next().children('.subtext').children();
      var points = $(subtext).eq(0).text();
      var username = $(subtext).eq(1).text();
      var comments = $(subtext).eq(2).text();
      // Our parsed meta data object
      var metadata = {
        rank: parseInt(rank),
        title: title,
        url: url,
        points: parseInt(points),
        username: username,
        comments: parseInt(comments)
      };
      console.log(metadata);
    });
  }
});
Here is an Overview of what the Added Code Does:
Select the previous element:
var a = $(this).prev();
Get the rank by parsing the element two levels above the "a" element:
var rank = a.parent().parent().text();
Parse the link title:
var title = a.text();
Parse the href attribute from the "a" element:
var url = a.attr('href');
Get the subtext children from the next row in the HTML table:
var subtext = a.parent().parent().next().children('.subtext').children();
Extract the relevant data from the children:
var points = $(subtext).eq(0).text();
var username = $(subtext).eq(1).text();
var comments = $(subtext).eq(2).text();
Running the modified script should output an array of objects like this:
[ { rank: 1,
    title: 'The Meteoric Rise of DigitalOcean ',
    url: 'http://news.netcraft.com/archives/2013/06/13/the-meteoric-rise-of-digitalocean.html',
    points: 240,
    username: 'beigeotter',
    comments: 163 },
  { rank: 2,
    title: 'Introducing Private Networking',
    url: 'https://www.digitalocean.com/blog_posts/introducing-private-networking',
    points: 172,
    username: 'Goranek',
    comments: 75 },
...
That's it! You can now store the the extracted data in a database like MongoDB or Redis to further process it. Here is the full source code of our scrape.js file:
var request = require('request');
var cheerio = require('cheerio');

request('https://news.ycombinator.com', function (error, response, html) {
  if (!error && response.statusCode == 200) {
    var $ = cheerio.load(html);
    var parsedResults = [];
    $('span.comhead').each(function(i, element){
      // Select the previous element
      var a = $(this).prev();
      // Get the rank by parsing the element two levels above the "a" element
      var rank = a.parent().parent().text();
      // Parse the link title
      var title = a.text();
      // Parse the href attribute from the "a" element
      var url = a.attr('href');
      // Get the subtext children from the next row in the HTML table.
      var subtext = a.parent().parent().next().children('.subtext').children();
      // Extract the relevant data from the children
      var points = $(subtext).eq(0).text();
      var username = $(subtext).eq(1).text();
      var comments = $(subtext).eq(2).text();
      // Our parsed meta data object
      var metadata = {
        rank: parseInt(rank),
        title: title,
        url: url,
        points: parseInt(points),
        username: username,
        comments: parseInt(comments)
      };
      // Push meta-data into parsedResults array
      parsedResults.push(metadata);
    });
    // Log our finished parse results in the terminal
    console.log(parsedResults);
  }
});

9 Comments