Additional Recommended Steps for New CentOS 7 Servers
Introduction
After setting up the bare minimum configuration for a new server, there are some additional steps that are highly recommended in most cases. In this guide, we'll continue the configuration of our servers by tackling some recommended, but optional procedures.
Prerequisites and Goals
Before you start this guide, you should run through the CentOS 7 initial server setup guide. This is necessary in order to set up your user accounts, configure privilege elevation with sudo, and lock down SSH for security.
Once you have completed the guide above, you can continue with this article. In this guide, we will be focusing on configuring some optional but recommended components. This will involve setting our system up with a firewall and a swap file, and configuring Network Time Protocol synchronization.
Configuring a Basic Firewall
Firewalls provide a basic level of security for your server. These applications are responsible for denying traffic to every port on your server with exceptions for ports/services you have approved. CentOS ships with a firewall called firewalld. A tool called firewall-cmd can be used to configure your firewall policies. Our basic strategy will be to lock down everything that we do not have a good reason to keep open.
The firewalld service has the ability to make modifications without dropping current connections, so we can turn it on before creating our exceptions:
sudo systemctl start firewalld
Now that the service is up and running, we can use the firewall-cmd utility to get and set policy information for the firewall. The firewalld application uses the concept of "zones" to label the trustworthiness of the other hosts on a network. This labelling gives us the ability to assign different rules depending on how much we trust a network.
In this guide, we will only be adjusting the policies for the default zone. When we reload our firewall, this will be the zone applied to our interfaces. We should start by adding exceptions to our firewall for approved services. The most essential of these is SSH, since we need to retain remote administrative access to the server.
If you have not modified the port that the SSH daemon is running on, you can enable the service by name by typing:
sudo firewall-cmd --permanent --add-service=ssh
If you have changed the SSH port for your server, you will have to specify the new port explicitly. You will also need to include the protocol that the service utilizes. Only type the following if your SSH server has already been restarted to use the new port:
sudo firewall-cmd --permanent --remove-service=ssh
sudo firewall-cmd --permanent --add-port=4444/tcp
This is the bare minimum needed to retain administrative access to the server. If you plan on running additional services, you need to open the firewall for those as well.
If you plan on running a conventional HTTP web server, you will need to enable the http service:
sudo firewall-cmd --permanent --add-service=http
If you plan to run a web server with SSL/TLS enabled, you should allow traffic for https as well:
sudo firewall-cmd --permanent --add-service=https
If you need SMTP email enabled, you can type:
sudo firewall-cmd --permanent --add-service=smtp
To see any additional services that you can enable by name, type:
sudo firewall-cmd --get-services
When you are finished, you can see the list of the exceptions that will be implemented by typing:
sudo firewall-cmd --permanent --list-all
When you are ready to implement the changes, reload the firewall:
sudo firewall-cmd --reload
If, after testing, everything works as expected, you should make sure the firewall will be started at boot:
sudo systemctl enable firewalld
Remember that you will have to explicitly open the firewall (with services or ports) for any additional services that you may configure later.
Configure Timezones and Network Time Protocol Synchronization
The next step is to adjust the localization settings for your server and configure the Network Time Protocol (NTP) synchronization.
The first step will ensure that your server is operating under the correct time zone. The second step will configure your system to synchronize its system clock to the standard time maintained by a global network of NTP servers. This will help prevent some inconsistent behavior that can arise from out-of-sync clocks.
Configure Timezones
Our first step is to set our server's timezone. This is a very simple procedure that can be accomplished using the timedatectl command:
First, take a look at the available timezones by typing:
sudo timedatectl list-timezones
This will give you a list of the timezones available for your server. When you find the region/timezone setting that is correct for your server, set it by typing:
sudo timedatectl set-timezone region/timezone
For instance, to set it to United States eastern time, you can type:
sudo timedatectl set-timezone America/New_York
Your system will be updated to use the selected timezone. You can confirm this by typing:
sudo timedatectl
Configure NTP Synchronization
Now that you have your timezone set, we should configure NTP. This will allow your computer to stay in sync with other servers, leading to more predictability in operations that rely on having the correct time.
For NTP synchronization, we will use a service called ntp, which we can install from CentOS's default repositories:
sudo yum install ntp
Next, you need to start the service for this session. We will also enable the service so that it is automatically started each time the server boots:
sudo systemctl start ntpd
sudo systemctl enable ntpd
Your server will now automatically correct its system clock to align with the global servers.
Create a Swap File
Adding "swap" to a Linux server allows the system to move the less frequently accessed information of a running program from RAM to a location on disk. Accessing data stored on disk is much slower than accessing RAM, but having swap available can often be the difference between your application staying alive and crashing. This is especially useful if you plan to host any databases on your system.
Advice about the best size for a swap space varies significantly depending on the source consulted. Generally, an amount equal to or double the amount of RAM on your system is a good starting point.
Allocate the space you want to use for your swap file using the fallocate utility. For example, if we need a 4 Gigabyte file, we can create a swap file located at /swapfile by typing:
sudo fallocate -l 4G /swapfile
After creating the file, we need to restrict access to the file so that other users or processes cannot see what is written there:
sudo chmod 600 /swapfile
We now have a file with the correct permissions. To tell our system to format the file for swap, we can type:
sudo mkswap /swapfile
Now, tell the system it can use the swap file by typing:
sudo swapon /swapfile
Our system is using the swap file for this session, but we need to modify a system file so that our server will do this automatically at boot. You can do this by typing:
sudo sh -c 'echo "/swapfile none swap sw 0 0" >> /etc/fstab'
With this addition, your system should use your swap file automatically at each boot.
Where To Go from Here?
You now have a very decent beginning setup for your Linux server. From here, there are quite a few places you can go. First, you may wish to snapshot your server in its current configuration.
Take a Snapshot of your Current Configuration
If you are happy with your configuration and wish to use this as a base for future installations, you can take a snapshot of your server through the DigitalOcean control panel. Starting in October of 2016, snapshots cost $0.05 per gigabyte per month based on the amount of utilized space within the filesystem.
To do so, shutdown your server from the command line. While it is possible to snapshot a running system, powering down ensures that the files on disk are all in a consistent state:
sudo poweroff
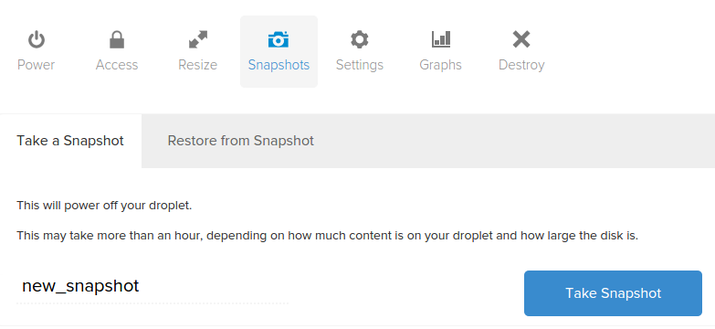
Now, in the DigitalOcean control panel, you can take a snapshot by visiting the "Snapshots" tab of your server:
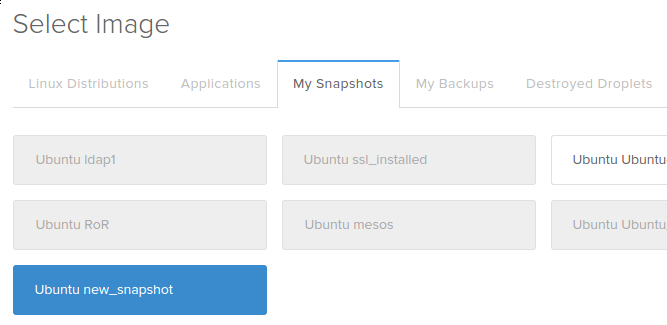
After taking your snapshot, you will be able to use that image as a base for future installations by selecting the snapshot from the "My Snapshots" tab for images during the creation process:
Additional Resources and Next Steps
From here, your path depends entirely on what you wish to do with your server. The list of guides below is in no way exhaustive, but represents some of the more common configurations that users turn to next:
- Setting up a LAMP (Linux, Apache, MySQL/MariaDB, PHP) stack
- Setting up a LEMP (Linux, Nginx, MySQL/MariaDB, PHP) stack
- Installing the WordPress CMS
- Installing Node.js
- Installing Puppet to manage your infrastructure
Conclusion
By this point, you should know how to configure a solid foundation for your new servers. Hopefully, you also have a good idea for your next steps. Feel free to explore the site for more ideas that you can implement on your server.

47 Comments