How To Use Ansible and Tinc VPN to Secure Your Server Infrastructure
Introduction
In this tutorial, we will demonstrate how to use Ansible, a configuration management tool, to set up a mesh VPN with Tinc to secure network communications between your Ubuntu and CentOS servers.
A mesh VPN is especially useful if your servers are using a shared network, because it enables your servers to communicate as if they were isolated on a truly private network. The extra layer of security provided by the authentication and encryption features of the VPN will protect the network communication of your private services—databases, Elasticsearch clusters, and more—from unauthorized access or attacks. If you are using DigitalOcean’s private networking feature, then is isolated between this security feature will already be enabled for servers on the same team or account within the same region.

Manually configuring and maintaining a VPN across multiple servers is difficult and error-prone, because multiple configuration and key files need distributed amongst all VPN members. For this reason, a configuration management tool should be used for any practical mesh VPN setup whose members might change at some point. Any configuration management tool can be used, but this tutorial uses Ansible because it is popular and easy to use. The Ansible Playbook that this tutorial uses, ansible-tinc, has been tested on Ubuntu 14.04 and CentOS 7 servers.
Background Reading
You should be able to follow this tutorial and set up a mesh VPN without knowing too much about Ansible or Tinc, as the included Playbook will do most of the work for you. However, you may want to read up on how they work, at some point, so that you understand the details of what you are setting up.
This Tinc VPN tutorial covers how to install and configure Tinc VPN manually. Using Ansible to automate the process makes it a lot easier to manage.
How to Install and Configure Ansible provides a very high-level introduction to how Ansible works. If you want to start writing Ansible Playbooks to automate system administrator tasks, check out this tutorial.
Prerequisites
Local Machine
The local machine is where you will execute the Ansible Playbook from. This could be your local machine (e.g. laptop) or some other server that you use to manage your servers. As mentioned earlier, it needs to be able to connect to each remote server as root.
Your local machine needs to have Ansible 2.0+ installed. Refer to the official Ansible installation documentation if you need to install it, as the installation process varies depending on your operating system or distribution.
Your local machine also needs to have Git installed, so you can easily download a copy of the ansible-tinc Playbook. Again, because the installation instructions depend on your local machine, refer to the official Git installation guide.
Remote Servers
The remote servers are the hosts that you want to configure to use Tinc VPN. You should start with at least two. To work with the Ansible Playbook, they must be:
- Running Ubuntu 14.04 or CentOS 7
- Accessible to the local machine (where Ansible is installed) via the
rootuser, with public key authentication
Note: It is not possible to use a different remote user at this time due to a bug with the Ansible Synchronize module, which the Playbook uses.
If you haven't already disabled password authentication for root, you can do so by adding PermitRootLogin without-password to your /etc/ssh/sshd_config file, then restarting SSH.
If you are using DigitalOcean Droplets that are within the same datacenter, you should enable Private Networking on all of them. This will allow you to use the private network interface, eth1, for the encrypted VPN communication. The provided Playbook assumes that every VPN node will use the same network device name.
Download Ansible-Tinc Playbook
Once you're ready to get started, use git clone to download a copy of the Playbook. We'll clone it to our home directory:
- cd ~
- git clone https://github.com/thisismitch/ansible-tinc
Now change to the newly-downloaded ansible-tinc directory:
- cd ansible-tinc
Note: The rest of this tutorial assumes that you are in the ansible-tinc directory, on your local machine. All Ansible commands must be executed from this directory. Also, all files referenced, with the exception of /etc/hosts, are relative to this path—e.g. hosts refers to ~/ansible-tinc/hosts.
Next, we will show you how to use the Playbook to create your mesh VPN. If you are familiar with Ansible, you may want to take some time to browse the contents of the Playbook. Essentially, it installs and configures a mesh VPN using Tinc, and it also adds convenience entries into each server's /etc/hosts.
Create Host Inventory File
Before running the Playbook, you must create a hosts file that contains information about the servers you want to include in your Tinc VPN. We'll go over the contents of the hosts file now.
[vpn]
node01 vpn_ip=10.0.0.1 ansible_host=192.0.2.55
node02 vpn_ip=10.0.0.2 ansible_host=192.0.2.240
node03 vpn_ip=10.0.0.3 ansible_host=198.51.100.4
node04 vpn_ip=10.0.0.4 ansible_host=198.51.100.36

[removevpn]
The first line, [vpn], specifies that the host entries directly below it are part of the "vpn" group. Members of this group will have the Tinc mesh VPN configured on them.
- The first column is where you set the inventory name of a host, "node01" in the first line of the example, how Ansible will refer to the host. This value is used to configure Tinc connections, and to generate
/etc/hostsentries. Do not use hyphens here, as Tinc does not support them in host names vpn_ipis the IP address that the node will use for the VPN. Assign this to the IP address that you want the server to use for its VPN connectionsansible_hostmust be set to a value that your local machine can reach the node at (i.e. a real IP address or hostname)
Therefore, in the example, we have four hosts that we want to configure in a mesh VPN that looks like this:
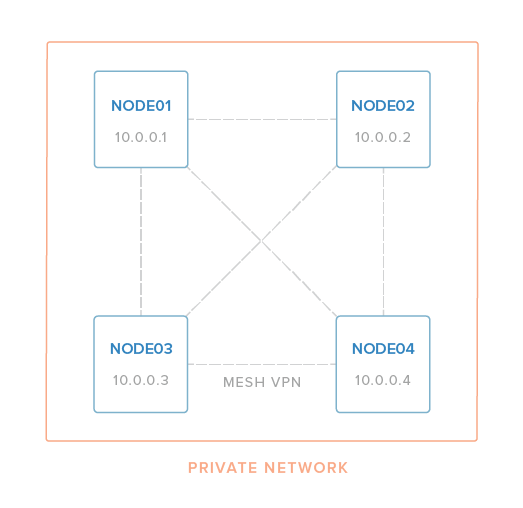
Once your hosts file contains all of the servers you want to include in your VPN, save your changes. Be sure that it does not contain duplicate entries (hostnames, vpn_ip addresses, or ansible_host values).
At this point, you should test that Ansible can connect to all of the hosts in your inventory file:
- ansible all -m ping
They should all respond with a green "SUCCESS" message. If any of the connections fail, check your hosts file for errors and ensure that all of the servers in question meet the requirements listed in the prerequisites section before moving on.
Review Group Variables
Before running the Playbook, you may want to review the contents of the /group_vars/all file:
- ---
-
- netname: nyc3
- physical_ip: "{{ ansible_eth1.ipv4.address }}"
-
- vpn_interface: tun0
-
- vpn_netmask: 255.255.255.0
- vpn_subnet_cidr_netmask: 32
The two most important variables are physical_ip and vpn_netmask:
physical_ipspecifies which IP address you want tinc to bind to. Here, we are leveraging an Ansible Fact to set it to the IP address of theeth1network device. On DigitalOcean,eth1is the private network interface, so Private Networking must be enabled unless you would rather use the public network interface,eth0, by changing its value to{{ ansible_eth0.ipv4.address }}vpn_netmaskspecifies the netmask that the will be applied to the VPN interface. By default, it's set to255.255.255.0, which means that eachvpn_ipis a Class C address which can only communicate with other hosts within the same subnet. For example, a10.0.0.xwill not be able to communicate with a10.0.1.xhost unless the subnet is enlarged by changingvpn_netmaskto something like255.255.0.0.
Note: The security benefits of the VPN can be extended to your servers over the public Internet, but keep in mind that the communication will still have the same latency and bandwidth limitations as the non-VPN connection.
Here's an explanation of the other settings:
netnamespecifies the tinc netname. It's set tonyc3by default.vpn_interfaceis the name of the virtual network interface that tinc will use. It istun0by default.vpn_subnet_cidr_netmaskis set to 32, which indicates a single-host subnet (point-to-point) because we are configuring a mesh VPN. Don't change this value.
Once you're done reviewing the group variables, you should be ready move on to the next step.
Deploy Tinc VPN
Now that have created an inventory hosts file and reviewed the group variables, you're ready to deploy Tinc and set up the VPN across your servers by running the Playbook.
From the ansible-tinc directory, run this command to run the Playbook:
- ansible-playbook site.yml
While the Playbook runs, it should provide the output of each task that is executed. If everything is configured correctly, you should see several ok and changed statuses, and zero failed statuses:
PLAY RECAP *********************************************************************node01                     : ok=18   changed=15   unreachable=0    failed=0
node02                     : ok=18   changed=15   unreachable=0    failed=0
node03                     : ok=21   changed=19   unreachable=0    failed=0
node04                     : ok=21   changed=19   unreachable=0    failed=0
If there are no failed tasks, all of the hosts in the inventory file should be able to communicate with each other over the VPN network.
Test the VPN
Log in to your first host and ping the second host:
- ping 10.0.0.2
Because the Playbook automatically creates /etc/hosts entries that point the inventory hostname to the VPN IP address of each member, you can also do something like this (assuming one of your hosts is named node02 in the Ansible hosts file):
- ping node02
Either way, you should see valid ping responses:
[secondary_label Output:
PING node02 (10.0.0.2) 56(84) bytes of data.
64 bytes from node02 (10.0.0.2): icmp_seq=1 ttl=64 time=1.42 ms
64 bytes from node02 (10.0.0.2): icmp_seq=2 ttl=64 time=1.03 ms
...
Feel free to test the VPN connections between the other nodes.
Note: Tinc uses port 655. If your ping test isn't working, be sure that the firewall of each node allows the appropriate traffic over the real network device that the VPN is using.
Once you complete your testing, your mesh VPN is ready to be used!
Configure Services and Applications
Now that your mesh VPN is set up, you need to be sure to configure your backend services and applications to use it (where appropriate). This means that any services that should be communicating over the VPN need to use the appropriate VPN IP addresses (vpn_ip) instead of the normal private IP address.
For example, assume you're running a LEMP stack with Nginx on node01 and a MySQL database on node02. MySQL should be configured to bind to the VPN IP address 10.0.0.2, the PHP application should connect to the database at 10.0.0.2, and Nginx should listen on 192.0.2.55 (node01's public IP address).
For another example, if node01, node02, and node03 are nodes in an Elasticsearch cluster, Elasticsearch should be configured to use 10.0.0.1, 10.0.0.2, and 10.0.0.3 as the node IP addresses. Likewise, any clients that connect to the cluster should use the VPN addresses as well.
Firewall Considerations
You may need to update your firewall rules to allow traffic on the VPN network device, "tun0", or the VPN IP addresses.
How to Add or Remove Servers
Add New Servers
All servers listed in the the [vpn] group in the hosts file will be part of the VPN. To add new VPN members, simply add the new servers to the [vpn] group then re-run the Playbook:
- ansible-playbook site.yml
Remove Servers
To remove VPN members, move hosts entries of the servers you want to remove under the [removevpn] group towards the bottom of the file.
For example, if we wanted to remove node04, the hosts file would look like this:
[vpn]
node01 vpn_ip=10.0.0.1 ansible_host=192.0.2.55
node02 vpn_ip=10.0.0.2 ansible_host=192.0.2.240
node03 vpn_ip=10.0.0.3 ansible_host=198.51.100.4

[removevpn]
node04 vpn_ip=10.0.0.4 ansible_host=198.51.100.36
Save the hosts file. Note that the vpn_ip is optional and unused for [removevpn] group members.
Then re-run the Playbook:
- ansible-playbook site.yml
This will stop Tinc and delete the Tinc configuration and host key files from the members of the [removevpn] group, removing them from the VPN.
Note that removing hosts from the VPN will result in orphaned tinc hosts files and /etc/hosts entries on the remaining VPN members. This should not affect anything unless you later add new servers to the VPN but reuse the decommissioned names. Delete the appropriate /etc/hosts entries on each server, if this is a problem for you.
Conclusion
Your server infrastructure should now be secure by a mesh VPN, by using Tinc and Ansible! If you need to modify the playbook to meet your specific needs, feel free to fork it on GitHub.
Good luck!

16 Comments