How To Use the DigitalOcean Docker Application
Status: Archived
This article exists for historical reference and is no longer maintained.
Reason: This version is no longer available
See Instead:
- The latest Docker One-Click Application documentation.
An Article From Docker
Submitted by Andy Rothfusz
Introduction
So you’d like to try out Docker to create and run some services as containers? Thanks to DigitalOcean’s one-click apps, you can create a Droplet with Docker pre-installed, running and ready to go!
Prerequisites
Start by creating a new Droplet.
Under Choose an image, select the One-click apps tab:
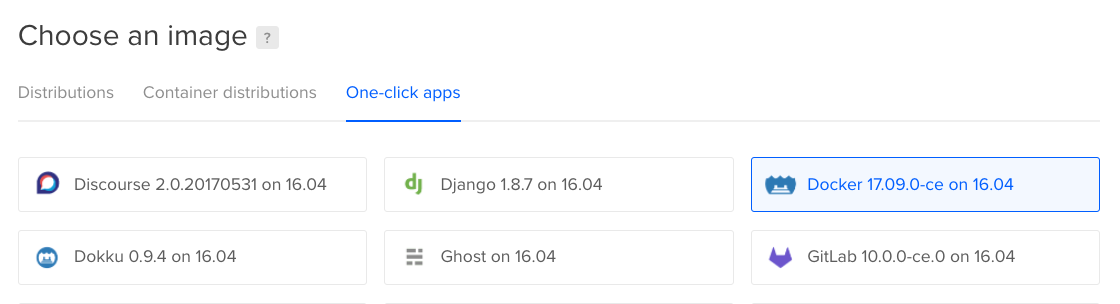
Select the Docker 17.09.9-ce on 16.04 (the version numbers might be higher by the time you read this article) option and you’ll create a droplet where all the steps for installing Docker on Ubuntu 13.04 are already complete. It’s a real time-saver and lets you dive right into trying out Docker.
Next, under Choose a size, select any size Droplet. All are sufficient for the basic Docker exercises we’ll present here.
Open a shell to your droplet and log in as root. docker -d is already running as a service and the docker command line tool ready to use on your PATH. You’re ready to start working with Docker and Linux Containers! You could jump over to the Docker Examples or stay here and we’ll walk through a few exercises and give some hints on configuring your DigitalOcean Droplet for easiest Docker use.
Step 1 — Running Hello World
Let’s run the traditional “Hello World”, Docker-style. Here my droplet is named “test” and I’m logged-in as root:
- docker run hello-world
OutputUnable to find image 'hello-world:latest' locally
latest: Pulling from library/hello-world
ca4f61b1923c: Pull complete
Digest: sha256:66ef312bbac49c39a89aa9bcc3cb4f3c9e7de3788c944158df3ee0176d32b751
Status: Downloaded newer image for hello-world:latest

Hello from Docker!
This message shows that your installation appears to be working correctly.
. . .
What happened there? Docker tried to start a Linux container with the name hello-world but couldn’t find it locally, so it automatically went to the Docker Hub to see if it could find it listed there. It found the image and downloaded it to your Droplet, started a container, ran the executable contained within, and streamed the results back to the Docker client and our terminal.
What happened to that hello-world image? It is now cached on your local Droplet. You’ll never need to download it again on this Droplet. Cached images can become the base for many subsequent images without creating multiple copies (Docker uses an efficient layered file system). Here’s how you check the images available locally:
- docker images
OutputREPOSITORY          TAG                 IMAGE ID            CREATED             SIZE
alpine              latest              3fd9065eaf02        47 hours ago        4.15MB
ubuntu              latest              00fd29ccc6f1        3 weeks ago         111MB
ubuntu              xenial              00fd29ccc6f1        3 weeks ago         111MB
ubuntu              trusty              67759a80360c        4 weeks ago         221MB
hello-world         latest              f2a91732366c        7 weeks ago         1.85kB
In fact, the writable file system layer used by the temporary container which echoed Hello from Docker! is still around too:
- docker ps -a
OutputCONTAINER ID        IMAGE               COMMAND                CREATED             STATUS                      PORTS               NAMES
8b65516fb182        hello-world         "/hello"               10 minutes ago      Exited (0) 10 minutes ago                       priceless_agnesi
That can be handy if the output from your software is a file on that file system. With Docker, you won’t lose anything until you explicitly remove it with docker rm (removes containers) or docker rmi (removes images).
Step 2 — Updating the Docker Version
Docker is still in rapid development, so there’s a good chance the version of docker in your Droplet is old. Let’s check:
- docker version
OutputClient:
 Version:      17.09.0-ce
 API version:  1.32
 Go version:   go1.8.3
 Git commit:   afdb6d4
 Built:        Tue Sep 26 22:42:18 2017
 OS/Arch:      linux/amd64

Server:
 Version:      17.09.0-ce
 API version:  1.32 (minimum version 1.12)
 Go version:   go1.8.3
 Git commit:   afdb6d4
 Built:        Tue Sep 26 22:40:56 2017
 OS/Arch:      linux/amd64
 Experimental: false
To see if updates are available, we'll use apt-get. The Droplet has already been configured to check the correct package repository:
- apt-get update
- apt-get upgrade
There will likely be a few packages that need to be upgraded. If docker-ce is listed during apt-get upgrade, your Docker installation is being upgraded.
Step 3 — Sharing with the docker Group
Up until now, we’ve been using docker as root, but you may want to create other users on the droplet which can also access the docker daemon. By default, the daemon is listening on a Unix socket which is owned by root and the docker group. We can share access to Docker by adding more people to the docker group.
First, set up a user account for working with docker as non-root. As an example, let’s call this user sammy:
- adduser sammy
Then, let’s change to the sammy account see what they can do with Docker:
- su -l sammy
- docker version
Output. . .
Got permission denied while trying to connect to the Docker daemon socket at unix:///var/run/docker.sock: Get http://%2Fvar%2Frun%2Fdocker.sock/v1.35/version: dial unix /var/run/docker.sock: connect: permission denied
There’s a permission problem with the Unix socket so we can’t talk to the daemon. Let’s go back to being root and get sammy into the right group:
- exit
Now, as root, add sammy to the docker group:
- usermod -a -G docker sammy
Now try to run docker version again as sammy:
- su -l sammy
- docker version
The command should output version information with no errors. Success! So now sammy can use Docker without even having sudo privileges. You’re ready to start pulling or building images to run software on your Droplet in nicely isolated containers.
Conclusion
DigitalOcean’s one-click app feature (and the image created by Ken Cochrane) has made it super easy to start working with Docker. If you’ve run through Docker's Getting Started Tutorial and you’re eager to begin working with the real docker daemon, it would be hard to find an easier way to start!

11 Comments