How to Use the DigitalOcean Dokku Application
An article from Dokku
Submitted by Jeff Lindsay
Note: The Dokku project has changed significantly since this guide was written. The instructions below may not reflect the current state of the Dokku project.
Introduction
Dokku makes it easy to deploy and manage web applications on your own server in a way that’s very similar to Heroku. Except on DigitalOcean, it’s faster, cheaper, and you have more control. Now DigitalOcean has a one-click application for creating a Dokku Droplet, making it even easier to have your own private application platform in a matter of minutes.
We’re going to show you how simple it is to get started with step-by-step instructions. By the end, you’ll have a Heroku-style application running on a DigitalOcean Droplet, deployed via Git, and a Dokku instance ready for more.
Before we get started, be sure you have a DigitalOcean account. If not, go ahead and sign up.
Step 1: Create a Dokku Droplet
In your DigitalOcean control panel, press the Create Droplet button, to be taken to the creation screen.
Droplet Hostname: The hostname identifies your Droplet. Feel free to call your hostname anything you like. I’m just going to call mine “dokku”.
Select Size: Depending on how many applications you’ll be deploying, you may want a larger size Droplet. However, for most purposes the 512MB size is enough to get started. You can always change it later.
Select Region: Choose the region closest to you, or the people that will be accessing your applications.
Select Image: This is the important part! Under 'Select Image' choose 'Applications' and then select 'Dokku on Ubuntu 13.04'.

Lastly, you will need to have an SSH key installed for Dokku to accept deployments via Git push. You can set up an SSH key for Dokku in a later step, but it’s easier to just pick one now for your Droplet. If you don’t have any SSH keys set up with DigitalOcean, here is a great tutorial.
Now click the 'Create Droplet' button, and we’ll wait while the Droplet boots up.

Once your droplet is ready, you'll see a screen like this one:
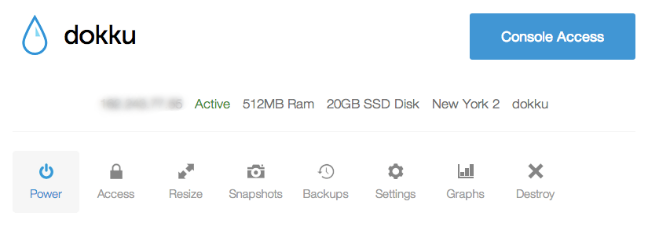
See the IP address on this screen? For the next step, you'll want to copy and paste that IP into your browser's address bar to load the Dokku setup page.
Step 2: Setting up Dokku
Browsing to the IP of your droplet, you should see a screen like this:
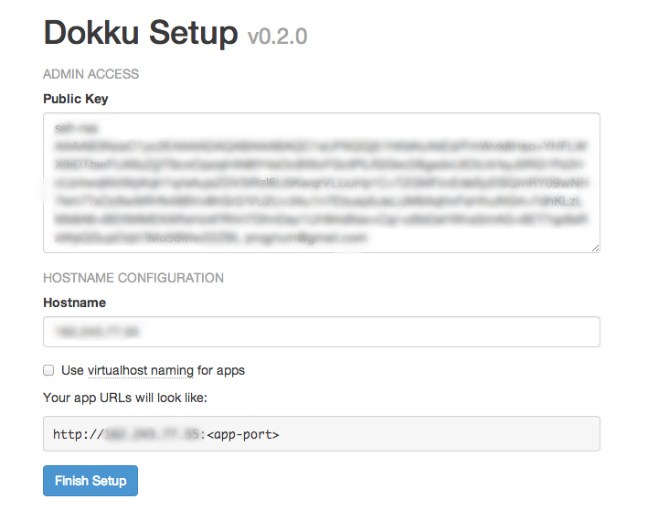
Admin Access
If you used a DigitalOcean SSH key with your Droplet, it should already be filled in for your admin SSH public key. Anybody set up with this key can deploy and manage apps on your Dokku. You can add more later, but this one is for you. If there’s no key in that first box, you’ll have to create a keypair and paste in the public key. Remember, here’s a great article if you forgot how.
Hostname Configuration
Unfortunately, Dokku doesn’t know what domain you want to use for your apps. Without a domain, you have to access each app with a different port number like the example on the screen above. However, most people want their apps to run as subdomains of a custom domain. For example, myapp.progriumapps.com.
In order to have this setup, you need to do three things:
Set up 2 DNS records for your domain that point to this IP
a. First, a regular A record (
progriumapps.com)
b. Second, a wildcard A record (*.progriumapps.com)Change the Hostname field on the Dokku Setup screen to your domain
Check the box that says Use virtualhost naming
For me, my Hostname Configuration now looks like this:

If you’re unsure how to achieve the DNS step, read this guide on how to set up a hostname with DigitalOcean.
That’s it! Click Finish Setup. If everything worked, it’ll take you to the Dokku README file on the next step which is to deploy an app.
Once you’re set up, the Dokku Setup page will no longer be available, so don’t worry if you don’t get anything when you browse to your IP again.
Step 3: Deploy an App!
Now for the fun part. Dokku supports many different languages and follows many standard application patterns. If you’ve never built an app that can run on Dokku, you can read documentation in our library about how to get your application to work with Dokku.
I’m going to deploy a sample application so that you can see how this works. Let’s go with a Node.js sample application. This is available on Github if you want to follow along with it.
After getting a fresh clone of this application using git, we need to add a git remote that points to the Dokku Droplet using the hostname we set up. If you were deploying your own app, you’d also add this remote. From the directory of your application on your computer, you’d run something like this:
git remote add dokku dokku@progriumapps.com:node-js-sample
If you weren’t able to set up a domain instead of an IP for the hostname, you’d use the IP instead of the domain. The name after the colon can be anything, but it will be the name used in the subdomain set it up with virtualhost naming.
Now we can deploy our app by pushing to the dokku remote. Be sure to include the branch:
git push dokku master
This should result in logs showing your app being built and deployed, finally resulting in a URL you can browse to and see that your application deployed successfully. Yay!
Next Steps
Despite being used by many people, Dokku is still quite an early project. You can read more about using Dokku on the README and soon there will be more in-depth documentation. Until then, there is a great community willing to help out if you run into problems. You can submit an issue on Github or join us in IRC on Freenode in the #dokku channel.
DigitalOcean is a perfect host for running Dokku, so hopefully you’ll enjoy playing around with Dokku and using it to manage and deploy your web applications.

46 Comments